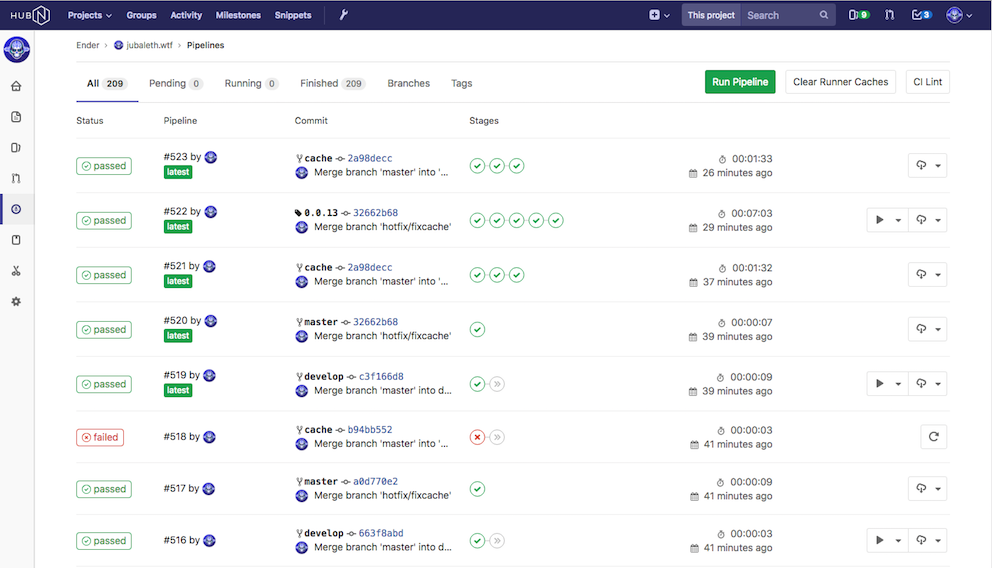
There are a number of ways that one can deploy a website; a completely automated deployment was my goal, and this is how I achieved it. I have two separate hosting solutions for this project, one for staging, and one for production. Staging, I host at home, with nginx, and production is hosted on S3. The tools I have chosen are GitLab CI and Deployer for PHP.
Gitlab CI
GitLab CI is a really nice addition to GitLab. It can build, test, and deploy. It integrates really well with GitLab (naturally), and is relatively configurable.
So, let’s get down to it.
The Build and Deployment Pipeline
The whole process that takes place after I push a branch to the repository, is completely automated. The only manual part of the process is deploying to staging. I chose this because I don’t necessarily want to deploy every time I push a branch. There are times in which I ask a few friends to proofread a post, check out a new feature, give feedback, etc., and it would be unideal to have that disappear if I’ve worked on and pushed a change in another branch.
Build Stages
I’ve opted for a 5 stage setup, each stage is responsible for one part of the build/deployment process.

Build
This stage causes Hugo to build the site, installs all the dependencies I need with composer ( all of which have to do with post-processing for a production deployment). This job will create an artifact archive, so it can be used by other jobs, without having to rebuild each time.
Optimize
The optimize job takes care of compressing PNG images. Technically, it can do all sorts of post-processing, but this is currently my only need.
Deploy
Deploying is different between my staging and production environments. Staging is hosted at home, with nginx on a virtual machine, nothing particularly fancy. Production is hosted on Amazon S3, with CloudFlare in front of it.
To deploy to my staging environment, I am using a tool called Deployer. It’s essentially a complete implementation of Capistrano, but in PHP. It’s a zero-downtime deployment tool, and honestly requires very little configuration. It’s got built in support for a number of frameworks, and the flexibility to define your own tasks.
A production deployment relies on the AWS cli tool, and performs a simple sync between what’s in my
public/directory and in my S3 bucket.Purge the Cache
In my production stack, I have CloudFlare sitting in front. I have a page rule defined there to cache everything. The HTML, CSS, JS, images, really everything. As my site is 100% static, there’s no reason not to throw everything into CloudFlare. After a production deployment, the content in my bucket will differ from what a user will see if they call up the page, so, I’ve got to tell CloudFlare to purge everything so that a fresh copy can be served up.
Warm up the cache
So that the first page-load after a cache purge isn’t slow, I warm up it up using wget as a lazy man’s crawler. One of the huge advantages to this, it will follow every link on my site. If there’s a broken link, the build will break, and I’ll know about it right away.
A production build will use all 5 stages, whereas for staging only build and deploy will be executed. This saves
a significant amount of time because images won’t be processed, and since there’s no caching on staging, there’s no purging
or warming to worry about.
Secret Variables
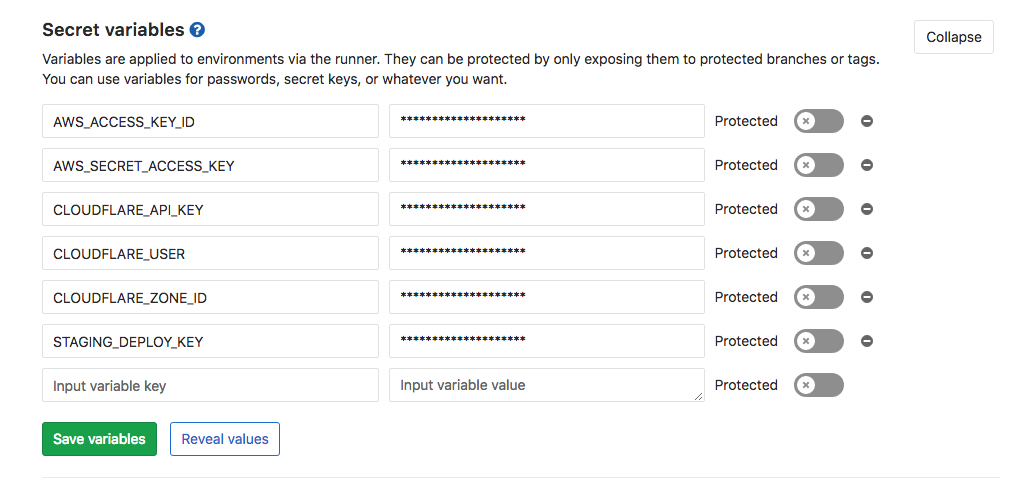
I wanted my deployment to be secure. Storing any kind of secrets directly in the repository is always to be avoided… Storing them on the runner is certainly one option, but still not ideal. It also creates more setup work for new runners. GitLab to the rescue!
Secret variables are a neat feature, where you can store your deployment secrets in GitLab, and they will be set as environment variables on the runner.
GitLab gives you the option to set a variable as ‘protected’, which means that it will only be exposed to builds on protected branches or tags. In my case, I opted to not protect the variables, as it ended up breaking some aspects of my build and complicated things slightly.

Environments
I have two environments setup, production and staging, and can deploy and rollback deployments for both.

Normally speaking a staging environment should be exactly the same as a production environment… So you can, you know…. test in an identical environment. This is not how I’m set up. As I explained earlier, my production environment is hosted on S3. My staging environment is hosted at home, and as I don’t really have AWS infrastructure here at home, it’s just a site sitting behind nginx.
CloudFlare CDN + Caching
The entire site gets cached by CloudFlare, which decreases load time by serving up a copy of the site from a server physically closest to the user. There are a number of reasons to use CloudFlare, including free SSL and of course, their CDN. They also provide some analytics as to whose accessing the site, where the traffic is coming from and how much of the traffic was receiving cached responses. The analytics are a bit limited, so I’ll be looking for something else to get a few more stats about the site, and how it’s used.
Caching Everything
Absolutely everything on the site is cached. The HTML, the CSS/JS, and the images. Since S3 is billed based
on how many requests are made, and how much bandwidth is used, it makes sense to try to minimize how often the
bucket’s contents is requested. By default, CloudFlare won’t cache markup because on a dynamic site, it changes. You
can tell them to throw everything in there, including the markup, with page rules.

Conclusion
That pretty much explains my whole setup for continuous integration. Do I really need all of this for a static site that doesn’t get massive amounts of traffic? Nope. But since when do I do things only out of necessity? It was a great learning experience, and I’ve already applied this new knowledge to another project. I was actually surprised with how easy it was to set up. GitLab CI has come a long way since it first came out.
Thanks for reading!